Please enable JavaScript to view this site.
Introduction
The QNTC file system is a subdivision of the IFS (Integrated File System) that enables the IBM i to access file and device shares on a remote Windows Server. Using the QNTC file system, your IBM i can read and write files that reside physically on a Windows Server.
NetServer/QNTC and SMB (Server Message Block) Support
IBM do not support SMB V3.0 in any current OS release. Support for SMB V2.0 has been included in V7R3 and is available as a PTF for V7R2. Please see the IBM Support page for details.
Pre-Requisites
To use QNTC, the only software you need other than the base operating system is IBM TCP/IP Connectivity Utilities
To check whether you have this installed you can do the following:
•GO LICPGM
•Select Option 10 – Display Licensed Programs.
•Look for: nnnnTC1 *COMPATIBLE IBM - TCP/IP Connectivity Utilities
where the number nnnn will vary with your IBMi Version and the description may be slightly different e.g. for V6R1M0 it is:
5761TC1 *COMPATIBLE IBM TCP/IP Connectivity Utilities for i5/OS
Setting up QNTC can be tricky and for full QNTC configuration information please refer to the IBM Knowledgebase. However, here is a quick overview of the steps you need to follow to set up QNTC.
•On your Windows Server:
oConfigure your Windows Server Domain / Workgroup Name
oConfigure a Windows User that has permission to WRITE to the required folder on the Windows Server e.g. CPPDQNTC.
Note 1: The User Name and Password must be restricted to 10 characters as this must EXACTLY match a User Id on the IBM i.
Note 2: If your IBM i is set to the default password level of '0' (System Value QPWDLVL), this causes QNTC to send an all lower-case password on the authentication attempt, then your password must be all lower-case to match.
•On your IBM i:
oConfigure your IBM i NetServer Domain name to match your Windows Server Domain / Workgroup Name.
oConfigure a IBM i User Id that EXACTLY matches the Windows User (Name and Password) e.g. CPPDQNTC. You may wish to limit the functionality of this user by using any or all of the following:
▪INLPGM(*NONE) - No program is called when the user signs on.
▪INLMNU(*SIGNOFF) - The system signs off the user when the program completes. As we are specifying *NONE for the initial program then the user will just be signed off.
▪LMTCPB(*YES) - The program, menu, and current library values cannot be changed on the sign-on display. Commands cannot be run when issued from a command line or by selecting an option from a command grouping menu such as CMDADD, but can still be run from a command entry screen.
▪GRPPRF(*NONE) - No group authority is given.
▪ATNPGM(*NONE) - No ATTN key handling program is used by this user.
▪PWDEXPITV(*NOMAX) - The password does not expire. Only set this if you are happy for the password for this user to never expire. This would need to be set in conjunction with the Windows User password expiration policy.
Note: It is vital that your IBM i User Id is recognised by the Windows Server as a valid network logon id, and that the passwords are the same on both the IBM i and the Windows Server. It may well be advisable to create a special user on the two platforms specifically for the purpose of communicating between them using QNTC. You can then ensure that when the password needs to be changed, it is changed on both systems, if this needs to be done manually.
To test your connection, first ensure that you are logged on to the IBM i using the User Id you have just created, then run the following command on the IBM i.
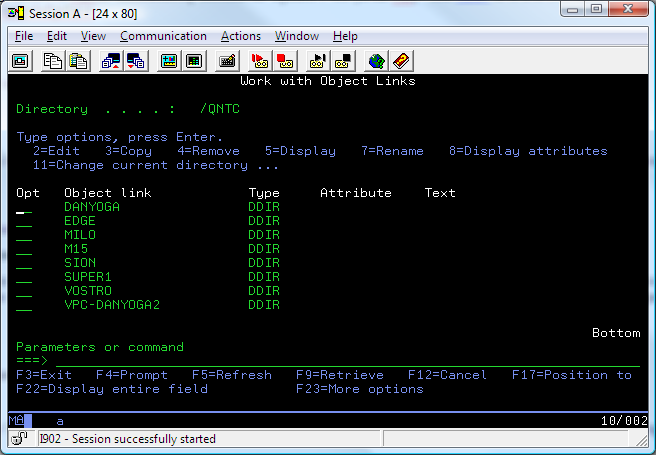
WRKLNK '/QNTC/*'
This could take several minutes to complete the first time it is run. Your Windows Server should appear on the list. If it doesn't, you may be able to manually establish a connection using command
CRTDIR '/QNTC/<servername>'
substituting the name of your Windows Server for <servername>.

Find your Windows Server in this list and choose 5=Display to display your file shares on the server. If the file shares don't appear, double-check that your User IDs and Passwords match exactly on both systems and that you have correctly Shared your folder.
You access the QNTC file system by including QNTC and the name of your Windows Server and share name in the path name you specify on the TOSTMF (To Stream File) parameter of the CVTDBFSTMF command.
For example, let’s imagine you have a Windows Server and you have decided that this is a convenient place to save the output so that all of your users can have shared access to the data. Let’s imagine that this server is called WindowsServer and that it has a file share name set up called FileStore. Below the share name, there is a directory called CustData. If you wanted to convert data from your customer file and save it as an Excel spreadsheet in this location under the file name customer_file.xls, you would run a command something like this:
CVTDBFSTMF FROMFILE(custfile)
TOSTMF(‘/QNTC/WindowsServer/FileStore/CustData/customer_file.xls’) TOFMT(*XLS)
Note that the path name starts with /QNTC. This indicates to the IBM i that you are referring to the QNTC File System. Following /QNTC is the name of the Windows Server to which the data is to be sent: WindowsServer. Next comes the name of the file share: FileStore. After that is the name of the folder below the share: CustData. Finally we have the name of the file itself: customer_file.xls.
